Showing posts with label Moon Munkie Make. Show all posts

Tuesday, May 22, 2012

Baby Shower Aftermath

As stated in one of my last posts (however briefly), life has been quite hectic in recent weeks. This seems to be a seasonal thing, as May is just wacky-packed full of family things. Which means a couple of things: I drop off the face of the blogging planet for a bit, and I get sick. :P

However, somewhere in the past two weeks, the baby shower I was talking up and preparing for with the use of Moon Munkie's goodies, finally came to pass. It was a pretty nice shower, I don't mind saying. Big, and full of people who adore my adorable sister-in-law.

Here's a visual review of some of the goodies that my family and I were able to pull together. My sister was in charge of the desserts, and my mom, cousins, and younger sister all helped me get all of my designated decoration projects done. I admittedly chose projects that would have better served a smaller shower (we made 80 favors and 80 pins, though I don't know that we needed to). Silly me. Fortunately, crafty hands run in the family and they all saved me from falling into a crafty wormhole of despair.


Shower cake courtesy of the family's favorite local bakery

Tulle instead of streamers.
I made a point NOT to make these tissue pompoms, but I did hang them with Moon Munkie yarn. 

Mini fruit tarts

The new and improved ivy banner, with little Moon Munkie flower accents

The favor envelopes
The envelope contents: seeds, quote, planting instructions

Family favorite: individual "Krispy Krespy" (Pistachio pudding, cream cheesy sweet stuff, whipped cream, and graham cracker crust. Not in that order.)

Sweetpea blossom pins from satin, tulle, and felt

Hanging flowers

Second hanging plant, used as prizes for the shower games

Individual pretzel salads

The dessert table; my brother, his wife, and they're pre-packaged bundle of joy. ;)
Ooops! Almost forgot to include my present for the wee 'un. Probably because I didn't take a decent picture of it, so tried to brush over it.

I made a quilt for my niece using my friend Eleanor Grosch's fabric that I mentioned ages ago:


I had thought I had gotten some better quality shots when my husband snuck a few in, but he deleted them because they weren't as good as I had thought. And with the rush to get the shower stuff and quilt done, I was just glad I could give it to her. :)

Wednesday, May 02, 2012

Bambi Shirt, Deconstructed


In entering into my second trimester and rediscovering this thing that folks call "energy" and this other thing called "motivation", I must admit that the high levels of what I perceive to be energy and motivation may just me being a little psychotically over-ambitious.

I'm not sure. But I think that might be what's actually going on here.

All I know is that I come home frantically thinking about all the sewing I should be getting done, trying to plow through, only to lose myself in the deadline instead of the process of sewing.

I haven't really spoken on Charlotte's concept for Mindful Sewing, but let me just say that it's a concept I aspire to endlessly. Just not accomplishing it very well. Instead, I want to sew like a freight train wants to arrive at its destination.

Such is what happened with my Bambi shirt, which, I suppose I thankfully could not immediately share due to technical difficulties after completing it. It forced me to slow down a little bit.

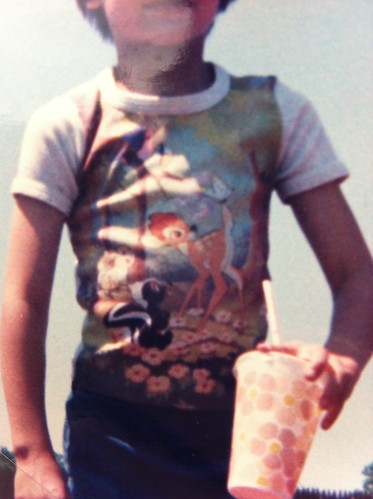
As stated earlier, I made the shirt for the Sew Weekly challenge based on a picture of me as a child. I wanted to use a picture of me at the age of five wearing a tiiiiiny little Bambi t-shirt. In my mind, it was my muscle shirt, and it was my favorite. I never felt tougher than when I wore my Bambi shirt. I could have sworn that I had a copy of the picture I had in mind a week or so ago, but I was to find I was wrong.


I had to take a quick phone pic at my mom's house yesterday so I could post this.

Anyhow, I'm going to do a quick and dirty review of the deets on the pattern and a confession of my issues with this project:

Details:
Source: Cation Designs
Pattern: Simplicity 9333, won in a Sew Grateful giveaway on Cation Designs. Altered via a tutorial to make it "maternity" that I can't seem to find now, and resized to be 34" bust instead of 36". Alterations include expanding the waist measurement by 2" on each side, lengthening the front, and adding ribbons in a lace casing to provide the ability to gather the sides or let them out.

Fabric:  super soft and bouncy remnant jersey, $7/ yard? (Everything is $7 to me if I can't remember. It's been in my stash for a while).

Notions: stretch lace and a blue button, courtesy of Kat's Moon Munkie Mystery Make package. Grosgrain ribbon. Acrylic paint


Additional: In order to make the shirt Bambi related, besides the tight fit (in some places), I added a print of a fawn silhouette. I admit I am pretty proud of drawing that little fawn myself. The butterfly came later.

Issues: 


1. PRIMARY ISSUE: I didn't do a muslin/toile.

2. I used a jersey that simply was not in existence in the 70s, which means it behaved in ways that just didn't suit the cut of the pattern.
Puffy sleeves, and weird neck pull.

3. Even after taking about 2 inches of ease out of these sleeves, they're still too puffy for my tastes.

4. The back was too droopy on me (see #2), and the zipper was totally inappropriate and wonked out the shape of the back (see pics).
Zipper totally bowing out the back
Excess fabric, wavy zipper, just not working.

Back, taken in. Button and eye/hook added to top later. Better, but I still feel like there's a mild case of scoliosis.
5. The alterations to make the shirt "maternity" spoiled some of the things I liked about the 70s design and any resemblance I originally saw in the pattern for my childhood shirt. I am hoping that the massive amounts of fabric will come in handy later, though.

6. The jersey is quite synthetic, and couldn't handle high temps from the iron, so my original plan to use a freezer paper stencil for the fawn was second guessed. I wasn't sure the freezer paper would stick at the fabric appropriate temp. So I used plain looseleaf, a roller for the acrylic paint, and totally slopped up the process.

7. The jersey was "hairier" than I anticipated, so the edges are muddled on the fawn.

8. I got paint on the shirt where I didn't want it. So I made it a butterfly.

9. In trying to add the lace casings for the ribbon, I overlooked the tension change, leaving me with some sloppy seams. I was too tired and crazed to care to change it at that point.

Conclusion:


Okay, so that wasn't very quick. But it was pretty dirty, right? I mean...
"Ruched" sides
So, I really do like this shirt, overall. Even with my gripes. I am a little scared to wash it with the acrylic print, though. I did heat set it, but we're back to issue #6. The fabric is super comfy, and it does offer plenty of room to grow. I'm proud of my little fawn, and hope to do it justice at a later date on another project. My main lesson in this project though is the idea that I need to slow down. Deadlines are generally arbitrary and never ultimately important. A good lesson to keep in mind when my due date approaches. ;)

I think this project counts as a Sew, Baby! entry for separates, altering patterns, and vintage, don't you?


Thursday, April 19, 2012

Moon Munkie Giveaway: Catching up!

Hey folks!

I am a little behind on posts, as I've been really focusing on conquering that sewing room of mine. If I can get the stash down to manageable levels before the wee one arrives, I may actually have a  place to put the darlin'.

Progress is slow, mind you. In part because I continue to get more and more goodies! :) Kat participated in the Moon Munkie giveaway and offered her own little packages to some lucky winners. One of the winners didn't respond, and I was able to step in as a substitute winner.


Here's what I received:


Nice, right? The fabric in the background has species native to New Zealand all over it, and as Kat noted  in her card, I am an avid fan of little critters. The stranger the better. And being the isolated islands that it is, New Zealand is bound to be full of fun little creatures. I already know what I'm going to use some of this fabric for, so I hope to post on one of the finished projects in the next couple weeks (As I've had Kat's package for a couple weeks now.)

And the pattern for pajamas has arrived right on time for me to participate in the Pyjama Party hosted by Did You Make That? I may veer towards pajama shorts, but we'll have to see. I'm sure super comfy pants will be welcome as I continue to become more awkward and ball-like in the next few months. :)


And if you haven't seen the two projects that Maider's posted using the stuff I sent her? She's actually just let us know who won her own Moon Munkie packages, so I am sadly too late to convince any of you to sign up for them. But I do love her innovative use of the plastic craft mesh (for lack of a better term),

Source: Masustak eguzkitan

and I am  especially fond of her refashion of the skirt I sent.

Source: Masustak eguzkitan

Wednesday, April 04, 2012

Moon Munkie Make #2: Fabric Sweetpea Blossoms


I know. Promises, promises. I tell you I'm going to post, and then I don't. C'est la vie, je suppose. I must say I'm not surprised. I often find that when I make commitments, I tend to follow through only on those that have a deadline that requires in-person performance/presentation of the results. Like, if a whole bunch of folks all agree that something needs to be done by a certain day, I'll likely rush to get it done. When I set my own deadlines, I am far worse at seeing things to their completion.

That being said, I am quite proud to say that all of these pictures and project works were done well before my verbalized deadline of last Saturday. Or last Monday.

So, there's that.

Now, onward to my little mock-up tutorial on the fabric sweet pea blossoms that I made, and on the little seed packets I added in. When I saw the purple fabric squares that Moon Munkie gave me in my package, they immediately fit in with my germinating notions on what to do for my sister-in-law's baby shower in May.

With "Sweetpea" as the decorating theme that was chosen for the party, little purple flowers seemed just the thing to do for some small decoration accents at the party. I used this tutorial  and this one as my bases, though they work with crepe paper, which I think gives a nice flaring option for the outer petals that I cannot get with quilting cotton.


Starting goodies
The first step I took was to fold the squares in half and trace circles that filled out much of the triangle.

snip, snip!

Lovely little lavender circles

Taking two contrasting circles, I placed them one on top of the other and pinched them in the middle. I had originally imagined trying to place some of the sweet pea seeds I bought for the party favors inside, but the circles here were too small. And I think it'd compromise the gathering, though I'll likely try it later with larger circles just in case.

Gather in the middle with a pinch.

Taking floral/craft wire, I simply wrapped around the middle and then flared the petals out. The inner petals, I tend to tug a little down, so that the top petal can peak out over the top.

Et, voila!
And that's pretty much it. A cute purple little sweet pea blossom to attach to things as you see fit. :)

I am contemplating making the leaves/outer green portion of the flower and then using floral tape and wire to make stems and little curlicues. See here:

Source: all things paper
But I may also use these fabric ones to decorate the "grace" wall hanging. I would have even showed you how it looked on the hanging I posted on earlier, if it hadn't blown away off my porch this past week. Ah well. More ivy is waiting for snipping and forming, I suppose.

I know that someone had stated she used some fusible webbing to strengthen the fabric she used on her version of these, and I do wonder if adding some starch or other stiffener may help with long-term aesthetics. I'm not sure though. I do think the crepe paper adds a small advantage in that department.

With the scraps, I was able to make teeeeeeny tiny little seed packets with twisted wire closures. I am imagining up ways to incorporate them into the party favors. They are so teeny, I worry they are anticlimactic on their own.  I haven't found a satisfactory delivery agent, so if any of you have any suggestions (preferably cheap!), let me know! Currently, I have quotes on seeds and grace that I expect to accompany each party favor.

small wrap

finished results, taken too late in the day and mangled by a flash
http://moonmunkie.wordpress.com/2012/02/15/moon-munkie-mystery-make-giveaway-experiment/

Tuesday, March 27, 2012

Moon Munkie Make Project #1: Vine Banner

Yay, Spring!
Soooo, I would like to first let you folks know that these projects being posted are drafts. I only let you know that because I am a bit timid on the use of Moon Munkie's goodies on some of these things because I want to make sure I'll have enough to use them for the final draft.


As stated earlier, I want to use the goodies Jemma sent to make some decorations for my sister-in-law's baby shower coming in May. The theme will be Sweet Pea, since this is one of her decorating themes for their expected wee'un come June. It made sense to me to stick with a heavy spring-y, floral theme. Light and green. One of the first things I wanted to do was make something similar to this from Martha Stewart:

Source: Martha Stewart
Instead of "bebe", I thought it'd be nice to do the sweet pea's anticipated name: Grace. My initial thought was to do this with grapevine, as my cousin's yard sports a good bit of it and it is so often used for shaping and wreaths. Unfortunately, after an afternoon of trekking through the woods and gathering some grapevine, I found that it was still too brittle to bend and shape for what I had in mind. At least, it is too brittle in March.

My cousin made an honest effort though, and I have to give her credit for persevering and coming up with some decent letters with the help of lots of floral wire.


I was a tad bummed until a week later when I realized that my home is surrounded by ivy vines, which are thinner than grapevine and tend to be evergreen and much more pliable. Using floral wire and then the lovely yarn from Jemma, I constructed a preliminary "grace".


 I think that it will read better when each letter is hung from its own string to its own anchor. The use of just the one nail in the side of my house limited my display options, and cramped the "r" and "a" too close for my tastes.

As stated earlier, the end product is not so "end". I will be adding additional accents with the yarn on the letters, so that it will tie the, er, ties, into the piece more cohesively. I also plan on using Jemma's die-cut purple flowers on the name as accents as well, but did not want to attach them to this draft version.  I imagine it would be something like this:


I'm also not quite sure if the letters will be more or less legible with more ivy. My mother suggested adding more, but then I fear it will be just a jumble of leaves and no shape. And, in truth, who says I have to make the final version out of ivy? Perhaps there will be another plant well suited to wire shaping and the "sweet pea" theme? I mean, Martha looks to have used lavender. If only I thought sweet peas would survive the anticipated May heat, I'd grow some for the party to use...

What do you think?

Saturday, March 24, 2012

Moon Munkie Packages Are Arriving!

I have finished on project for the Moon Munkie Make challenge, and hope to post it on Monday when I'll have time to transfer pictures from my camera. And then I'll have another post to share, hopefully by Thursday next week with some of the other materials. I must say that I love how the color scheme Moon Munkie provided actually works so well for the sweetpea theme for my sister-in-law's baby shower.


Source: Masustak Eguzkitan
In the meantime, I sent off packages around the world last week (Spain, England, New Zealand!) and it sounds like all of them have arrived safe and sound. Yay!

Source: House of Pinheiro
When I made these packages, I have to admit that I was overwhelmed with trying to share fairly and to give items that would be useable for the sewists they were destined for. I did try to color coordinate when I could, but I felt so self-conscious about getting folks useable materials. But seeing Rachel's and Maider's posts, I realize that perhaps I did an okay job. They certainly know how to make all the small bits of material look tons more exciting than when I was packing them.

Can't wait to see what they come up with!

Monday, March 05, 2012

Moon Munkie Mystery Make Winners!


I just received Moon Munkie's package in the mail Saturday night! Want to see what I got?


Pretty nice, right? All nice and coordinated and lovely and itchy-finger making. :)

I have a couple ideas on what to use some of the pieces for, as I have some upcoming projects I have to make for a certain baby shower for a certain sister-in-law. Some of the projects I can get done within the month, so I'll stick with those. Others may have to wait until later this Spring.

Do any of these goodies inspire you? What would you make?


And don't think I have forgotten to name my package winners for my own giveaway. I had five folks volunteer to join in the fun, so I'm just going to make five packages instead of four. The folks who have agreed to make stuff out of my eclectic medium-sized packages of goodies are: Kat, Rachel, Moon Munkie, Marilo, and Masustak Eguzkitan!! I have some of your addresses, but if you could email them to me at sneakfuzz (at) hotmail (dot) com just to make sure I have them right, I'd appreciate it.

I will let you ladies know when the packages are sent out. I hope you find something fun to make with what I'm sending!