Showing posts with label novice sewer. Show all posts

Wednesday, May 02, 2012

Bambi Shirt, Deconstructed


In entering into my second trimester and rediscovering this thing that folks call "energy" and this other thing called "motivation", I must admit that the high levels of what I perceive to be energy and motivation may just me being a little psychotically over-ambitious.

I'm not sure. But I think that might be what's actually going on here.

All I know is that I come home frantically thinking about all the sewing I should be getting done, trying to plow through, only to lose myself in the deadline instead of the process of sewing.

I haven't really spoken on Charlotte's concept for Mindful Sewing, but let me just say that it's a concept I aspire to endlessly. Just not accomplishing it very well. Instead, I want to sew like a freight train wants to arrive at its destination.

Such is what happened with my Bambi shirt, which, I suppose I thankfully could not immediately share due to technical difficulties after completing it. It forced me to slow down a little bit.

As stated earlier, I made the shirt for the Sew Weekly challenge based on a picture of me as a child. I wanted to use a picture of me at the age of five wearing a tiiiiiny little Bambi t-shirt. In my mind, it was my muscle shirt, and it was my favorite. I never felt tougher than when I wore my Bambi shirt. I could have sworn that I had a copy of the picture I had in mind a week or so ago, but I was to find I was wrong.


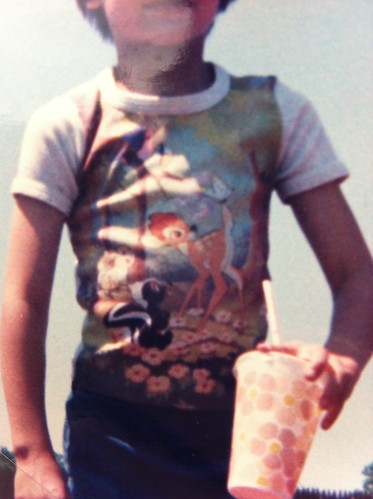
I had to take a quick phone pic at my mom's house yesterday so I could post this.

Anyhow, I'm going to do a quick and dirty review of the deets on the pattern and a confession of my issues with this project:

Details:
Source: Cation Designs
Pattern: Simplicity 9333, won in a Sew Grateful giveaway on Cation Designs. Altered via a tutorial to make it "maternity" that I can't seem to find now, and resized to be 34" bust instead of 36". Alterations include expanding the waist measurement by 2" on each side, lengthening the front, and adding ribbons in a lace casing to provide the ability to gather the sides or let them out.

Fabric:  super soft and bouncy remnant jersey, $7/ yard? (Everything is $7 to me if I can't remember. It's been in my stash for a while).

Notions: stretch lace and a blue button, courtesy of Kat's Moon Munkie Mystery Make package. Grosgrain ribbon. Acrylic paint


Additional: In order to make the shirt Bambi related, besides the tight fit (in some places), I added a print of a fawn silhouette. I admit I am pretty proud of drawing that little fawn myself. The butterfly came later.

Issues: 


1. PRIMARY ISSUE: I didn't do a muslin/toile.

2. I used a jersey that simply was not in existence in the 70s, which means it behaved in ways that just didn't suit the cut of the pattern.
Puffy sleeves, and weird neck pull.

3. Even after taking about 2 inches of ease out of these sleeves, they're still too puffy for my tastes.

4. The back was too droopy on me (see #2), and the zipper was totally inappropriate and wonked out the shape of the back (see pics).
Zipper totally bowing out the back
Excess fabric, wavy zipper, just not working.

Back, taken in. Button and eye/hook added to top later. Better, but I still feel like there's a mild case of scoliosis.
5. The alterations to make the shirt "maternity" spoiled some of the things I liked about the 70s design and any resemblance I originally saw in the pattern for my childhood shirt. I am hoping that the massive amounts of fabric will come in handy later, though.

6. The jersey is quite synthetic, and couldn't handle high temps from the iron, so my original plan to use a freezer paper stencil for the fawn was second guessed. I wasn't sure the freezer paper would stick at the fabric appropriate temp. So I used plain looseleaf, a roller for the acrylic paint, and totally slopped up the process.

7. The jersey was "hairier" than I anticipated, so the edges are muddled on the fawn.

8. I got paint on the shirt where I didn't want it. So I made it a butterfly.

9. In trying to add the lace casings for the ribbon, I overlooked the tension change, leaving me with some sloppy seams. I was too tired and crazed to care to change it at that point.

Conclusion:


Okay, so that wasn't very quick. But it was pretty dirty, right? I mean...
"Ruched" sides
So, I really do like this shirt, overall. Even with my gripes. I am a little scared to wash it with the acrylic print, though. I did heat set it, but we're back to issue #6. The fabric is super comfy, and it does offer plenty of room to grow. I'm proud of my little fawn, and hope to do it justice at a later date on another project. My main lesson in this project though is the idea that I need to slow down. Deadlines are generally arbitrary and never ultimately important. A good lesson to keep in mind when my due date approaches. ;)

I think this project counts as a Sew, Baby! entry for separates, altering patterns, and vintage, don't you?


Tuesday, June 07, 2011

Presser Feet


In line with the last post on how Colette Patterns' blog and snippets always seem to address issues relevant to me, I thought I'd finally post on my presser feet.
Good old standard, I know you.
Now, the original intention of the post was to do my research and explain what all of the presser feet that I found with my mom's sewing machine were actually for.

button hole guide?? upside down??
But it's been months, and I still haven't done that. I'm still waiting for Singer to send me their manual for this machine. The slackers. And I just never feel it when I try to google all of my presser feet. I mean, really, it would work better if I knew what all of the presser feet names actually were, so I could make an educated guess and do image searches to compare and contrast. But I still am a bit in the dark about that. And so it remains to be done.
??whawha?? and zipper foot

So, instead, I'm just going to post all of the pretty pictures I took (it'd be such a waste not to at least enjoy them for their aesthetic value). I mean, if any of you want to tell me what species of presser feet I'm actually looking at, *shrug* I'm cool with that. I'm all ears about these feet.


Is one of these a flat felled seam foot?

Saturday, June 04, 2011

Colette Saves My Day, Always


I feel like Colette Patterns' blog reads my mind. Not even my blog, my mind. I have an old post waiting to be written on needing to figure out my presser foot collection, and they send out a little Snippet on that very subject this week. I have all these questions that I just want to post about small details I don't know (Novice Sewer Vents), and they're well ahead of my posts in terms of answering my questions.

However, the best thing Colette Patterns has done for me yet was this post on how we can still access the information on Vintage Sewing Info despite the loss of the website. I knew you could go back and find the cached sites, but wasn't sure about the process.

They've taken the work out of it, by giving us this post. So I can go here. And here. And here. And more places!

And that's why I love them.

A lot.

Thanks Colette. From the bottom of my heart.
Photo credit: Zazzle.com

And as a complete side note. Singer still hasn't sent me my sewing machine's manual. Lame. Singer, you're more at the bottom of my list of likable things right now.http://www.colettepatterns.com/

Thursday, May 12, 2011

Crepe Sew-Along, Coming Along

I'd post pictures if it didn't mean I had to go take them and then upload them.

I just want to say that a) I am quiet on here in part because I am sewing (taking the Sewing Productivity Project's advice), and b) no matter how hard I try, I always manage to make some egregious error in my measurements. My back bodice pieces are about an inch shorter than my front bodice piece. Ugh. After I tried to adjust for it being too long previously, no less. I think I can flub it when I attach the skirt, but I find myself trying to think of creative corrections that don't involve tearing it all apart again. How do I always do this?

As I plan on wearing this dress on Saturday, pictures and progress will be posted soon, though.  I'll go more into my random improvisations to save this dress then, and I'll look all heroic with the finished product too. (I hope!)

Monday, April 18, 2011

Novice Sewer Reference Page

Now, no worries, I still plan on venting on my lack of knowledge as I continue pursuing this sewing obsession of mine. (I would like to refer you to this little write-up to explain just how bad it is.)

However, I thought that I would at least offer a general review of the resources I've pursued and perused as I slowly knock my head against my computer screen in confusion. So, I have added an additional page to my site titled Novice Sewer Resources. As the page states, it's my bloggerography/bibliography of helpful information I've found on sewing basics (and not so basics, too). I know that I may be repeating the work of others, but then again, others' study sheets for college exams never helped me out as much as my own.


I would apologize for my apparent favoring of certain sites, but I feel like they have snagged my attentions because they are so good. Why apologize for something that just makes good sense?

So, please feel free to make use of what is really just my sewing cheat sheet/wishful thinking list of goals. I hope others find it useful and navigable.  It is certainly an imperfect compilation, but I will be adding to it throughout. It may even get prettier.

I have also moved my completed projects to another page, so that I don't have an entire side of my page filled with buttons. I'm hoping it makes it easier for folks to see what I'm currently working on, but still can see what I've been up to in the past.

All I can hope is that you will find these pages helpful. Any constructive feedback is welcome, so please, give it.

Thanks!

Thursday, April 14, 2011

Crepe Sew-Along: muslin fitting

I spent some of Sunday night fitting my first Crepe muslin. The construction of the muslin was quick work, and it didn't look horrible at first fitting. However, lining up darts to where they're supposed to be, and cutting down the size of the sleeves resulted in more extensive tweeks than I expected.

Here is a fast pic of me wearing the pinned up muslin.

I sort of felt like I was designing a futuristic outfit, with big shoulder embellishments and strange random tucks everywhere.

Having done the muslin, I have learned a couple of things that I wish I had thought about sooner. First, I shouldn't cut out any pattern pieces for facing until after I've made all of my pattern adjustments. I'll be doing some major tweaks on the sleeves and back, as well as some minor ones on the neckline. Second, it really does help to do yoga if you're going to try and fit a dress pattern on yourself without any help. (My husband did help me once in the process, to be fair.) I'm glad I had just come out of a 2.5 hour yoga workshop that morning.

I have decided I'm going to make two versions of this dress. One will be a black/orange/red number to help me figure out skirt length and to play around with piping. The second will be the original white/blue/green number with the border print. I fell asleep dreaming about how to pull off certain details for each.

Monday, April 11, 2011

Novice Sewer Vent: Tools

This photo is about as clear as I am about my sewing machine

I know that this really is a personal issue. I could fix this on my own and just not complain about it, but I started this "series" of vents to share my frustration with my own personal cluelessness.

My hand-me-down
so simple!

If there's one thing that I am constantly reminded of as I sew and start new projects, it's that I really don't know how to use my sewing machine(s) effectively. I have two sewing machines at my house, one that my mom has lent me, and one that I got as a hand-me-down from someone moving. The hand-me-down used to be part of a sewing table, so it has a wobbly base, designed to be inset into a table top, and it's at least from the 80's. Neither came with a manual. (To be fair, my mom's machine came with a short description on how to thread the thing, which made the world of difference when I finally read it. But nothing else.) So, I'm sewing along without a clue, like a monkey at a typewriter hoping to write Shakespeare.

the blasted button hole "solution"
So, as humans are apt to do, when I try to do things a certain way and fail, I blame the tool instead of myself. I borrowed my mom's machine because I just couldn't figure out how to do buttonholes on my older machine. Hers had a fancy-schmancy button hole making option on it. I thought that my sewing machine was just lame. Instead of confirming my "lame machine" hypothesis, after I tried to use her machine to make button holes, and after I reviewed various tutorials on the subject, I had to admit that it's not my machine. It's me. And it's still me, because I can't figure out how to make either machine do button holes well. I have come up with a modest "cheat code" of sorts with my mom's machine, so I now at least make reasonable representations of button holes. But it's still a sad substitute. And folks, buttonholes are pretty easy in concept.


I could always get a new fangled sewing machine, because at least it'd come with a manual. It may even have the twenty some stitch options displayed in shiny sophistication. But I'd rather not. I would like this hobby to grow in a sustainable and responsible way. Buying new machines because the older ones are confusing feels too... consumerist?

Even with the sparse pickings compared to fancier models, I still don't know what all of these options mean.
So, I guess I should just order the manuals, huh?

Tuesday, March 15, 2011

Novice Sewer Vent, Introduction


One of the things that I have learned in the past few months about sewing is that in order to have a decent go at it, you have to learn a wide range of small details. There are aspects to the sewing process that I really had no idea were as relevant as they are to quality work. These aspects always seem to catch up with me right when I think I know how to do a piece. In the case of the Swing Dress Sew-Along, it was presser feet that got me. I mean, besides the sleeve fitting.

There's a wide range of questions that have arisen besides presser feet and sleeve fitting, though. So I thought it may be worthwhile if I were to actually make that part of my posting: as a novice seamstress, I'd like to make posts actually asking those of you out there what I'm supposed to do in certain situations. If I don't post a question, I'd at least like to post what I've learned already, so that it's out in cyberspace for general reference. I mean, there are numerous resources out there already, but finding them, reading them, and then tying it all together can get tedious. I'm going to try to see if I cannot get some resources centralized in one place.

In the next few weeks, I will try to start this series of "vents" before I start integrating all of this information and forgetting that it's not second nature to know these things. Let me know if there are certain subjects you also find confusing about sewing; I'll try to do some investigations to help us all out! Also, if you have a better name than "Novice Sewer Vent" for this kind of post, please let me know. It doesn't roll off the tongue at all, huh?

Sunday, March 13, 2011

Swing Dress Sew-Along, conclusion


I finally finished the Swing Dress Sew-Along this weekend with putting in the zipper, tackling those sleeves, hemming, and other finishing touches.

All in all, I am very happy with the experience, as I feel it gave me an idea of how to follow some decent sewing practices. It helped me learn/re-learn some basic techniques but also introduced some more advanced ones. Looking at this dress in its final
state, I feel like I finally have a piece of work that shows some measure of skill and forethought. All of my other projects that I've done over the years have been done more ad hoc. Finishing seams, making a muslin, altering patterns, choosing appropriate fabrics: all of these things were vague, strange concepts that I only glanced at nervously until this project. Going through this project along with more knowledgeable seamstresses online helped me pace myself a bit better and to understand it's worthwhile to restart things as long as the end product is well done.

There still are some things that I feel I have to learn more about, after having done this dress. I realize I have a very limited understanding of fabric and how to look for good fabric choices. I tried to follow the recommendations for types of fabric that would do well with the dress, but chose a very thin cotton lawn that needed underlining. When I went to JoAnn's to buy cotton batiste, I didn't get any help from staff. So, I went by tactile preference on this dress and got some cotton sateen, which makes it feel really good, but perhaps at the cost of a decent draping fabric.

I also did not do the side zipper very well. At this point, I am ready to be finished with the dress, so have no interest in redoing it. It is set into the dress well enough, and I just tidied the overlapping side of the dress placket zipper by adding a second seam. The overlap loses some of the smooth "hidden" look, but I'd rather ensure that the fabric in the seam doesn't get caught in the zipper teeth. If I were to do it again, I'd likely baste the inner seam closer to the zipper, so that it would lie flat closer to the actual seam.

I was able to figure out how to fit the sleeves better. Upon undoing one of the sleeves and reassessing the ease, I only had to take out about an inch to get it to line up better. I have to sew them into the armscyes more slowly, perhaps, as I had gotten random parts of the sleeve caught in the seam multiple times. But, they're decent. I look forward to the day when sleeves are far less work.

The icing on the cake, though, is my antique store brooch find! There were a lot of fun pins, but this one was half the price of the others I was looking at and had the added bonus of the blue accent. As my husband put it, it has just the right blue:yellow:off-white ratio for the dress.

My next major project will be posted about soon! In the meantime, I have to go cut patterns for some other side projects.